Skip to content
English
  • There are no suggestions because the search field is empty.

Plug the Entagged device into your camera

Table of contents


Overview

This article covers the setup and installation process for the different Entagged models (M, N1, N2), focusing on connecting the magnetic USB plug, positioning HDMI/USB cables, and ensuring proper functionality through compatibility checks. Unique installation details for each model are included.


Setting Up Your Entagged Device

Before you begin, ensure you have the correct Entagged model, USB or HDMI cable, and magnetic plug (if applicable) for your camera. You can check the Entagged compatibility list.

Disable the following settings before plugging in your Entagged device (if available on your camera):

  • ✓USB charging
  • ✓Built-in WiFi
  • ✓FTP Upload
  • ✓LAN
  • ✓Tethering

Please note: In this article, "USB" refers to USB-C, Micro-USB, Mini-USB, and USB-8P ports and cables. Similarly, "HDMI" will refer to standard HDMI (HDMI-A), Mini-HDMI (HDMI-C), and Micro-HDMI (HDMI-D) ports and cables. The type of cables needed depends on your camera model, which is why providing this information is necessary when purchasing your Entagged device. The setup process and outcome are the same.


Canon Setup

  1. 1Snap the magnetic USB plug onto the back of the Entagged device.
  2. 2With the Entagged logo facing you, ensure its port is facing upwards.
  3. 3Plug the "Foolography" end of the HDMI cable into the top of the Entagged. The cable should point to the right.
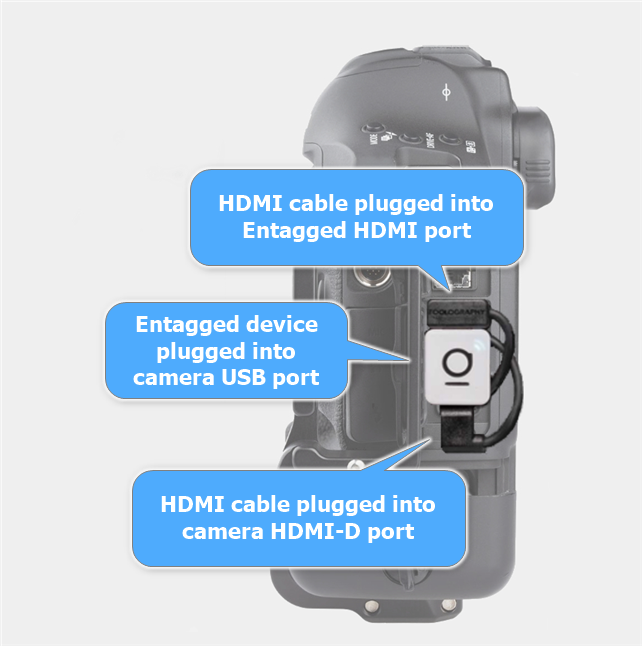
  4. 4Plug your Entagged device (with attached HDMI cable) into your camera’s USB port, and plug the other end of the HDMI cable into your camera’s HDMI port. If the HDMI cable is too close to the Entagged device, you can rotate the Entagged device by 90º or 180º to allow for more space. You can also tuck the HDMI cable behind the Entagged device for a cleaner look.
  5. 5Turn on your camera. The LED of the Entagged should now light up. If not, check that the cable is plugged in the correct direction (step 3) as this is one of the most frequent missteps.
An image showing the Entagged device connected to a Canon camera via the USB port, and a second HDMI cable also connected from the device to the camera.

If your camera has a Micro-USB 3.0 port: The Micro-USB 2.0 magnetic plug is backward compatible and fits into the wider half of the Micro-USB 3.0 port.


Nikon Setup

The instructions for plugging your Entagged device into your Nikon camera depend on the model of your Entagged device.

N1 Model

  1. 1For Z8 and Z9 models, change the USB setting in your camera menu to enable camera control:
    1. MENU > NETWORK (Globe)
    2. USB = MTP/PTP
    3. Below, tap Done.
    4. [Advanced] It's also advisable to change these settings:
      MENU -> SETUP (Wrench)
      USB Connection priority = Shooting (Camera)
      USB power delivery = OFF
  2. 2With the Entagged logo facing you, ensure the Entagged device port is facing upwards.
  3. 3Plug the "Foolography" end of the USB cable into the top of the Entagged. The cable should point to the right.
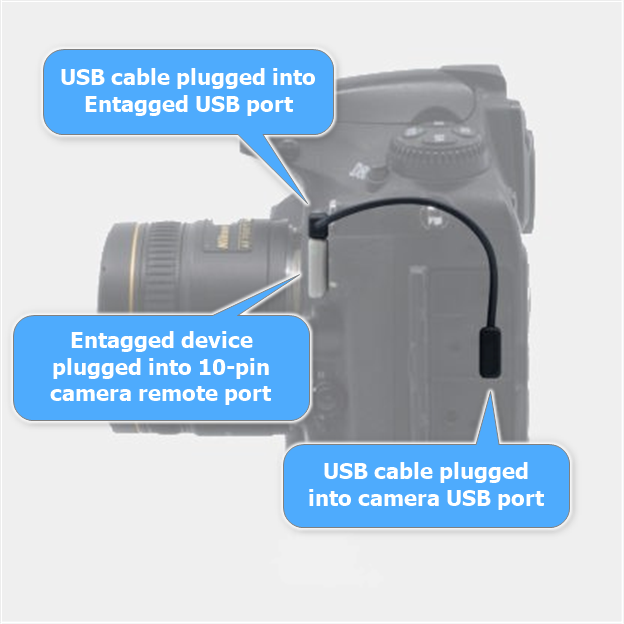
  4. 4Plug the Entagged device into the round 10-pin remote port on the front of your camera. It may be a little challenging to plug in at first, as the Entagged device is designed to fit snugly onto your camera without moving. Wiggling the Entagged a little as you insert it can make this easier.
  5. 5Plug the other end of the cable into the USB port of your camera.
  6. 6Turn on your camera. The LED of the Entagged should now light up. If not, check that the cable is plugged in the correct direction (step 3) as this is one of the most frequent missteps.

If your camera has a Micro-USB 3.0 port: The Micro-USB 2.0 plug is backward compatible and fits into the wider half of the Micro-USB 3.0 port.

An image showing the Entagged N1 device connected to the front of a Nikon Z9 camera, with the cable routed to the side USB port.

N2 Model

  1. 1For Z6 III, change the USB setting in your camera menu to enable camera control:
    1. MENU > NETWORK (Globe)
    2. USB = MTP/PTP
    3. Below, tap Done.
    4. [Advanced] It's also advisable to change these settings:
      MENU -> SETUP (Wrench)
      USB Connection priority = Shooting (Camera)
      USB power delivery = OFF
  2. 2With the Entagged logo facing you, ensure the Entagged device port is facing upwards.
  3. 3Plug the "Foolography" end of the USB cable into top of the Entagged. The cable should point to the left.
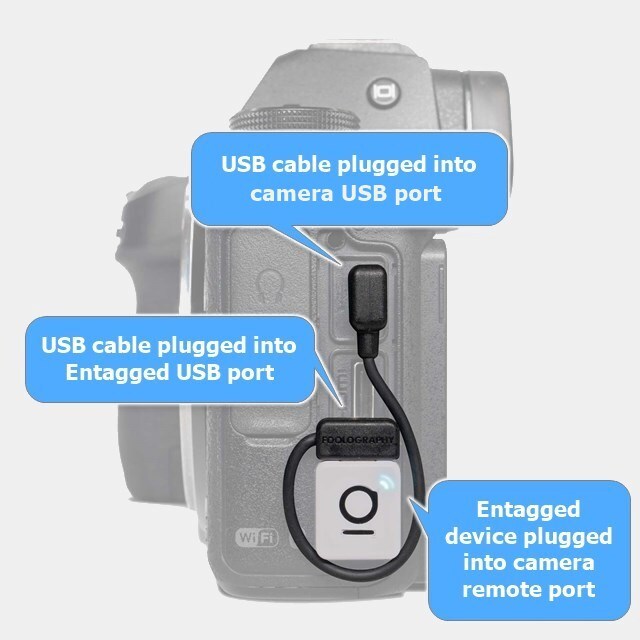
  4. 4Plug the Entagged device into the rectangular remote port on the side of your camera.
  5. 5Plug the other end of the cable into the USB port of your camera.
  6. 6Turn on your camera. The LED of the Entagged should now light up. If not, check that the cable is plugged in the correct direction (step 3) as this is one of the most frequent missteps.

If your camera has a Micro-USB 3.0 port: The Micro-USB 2.0 plug is backward compatible and fits into the wider half of the Micro-USB 3.0 port.

An image showing the Entagged N2 device connected to the side of a Nikon Z6 III camera, with the cable routed to the USB port.

M Model

  1. 1Snap the magnetic USB plug onto the back of the Entagged device.
  2. 2With the Entagged logo facing you, ensure its HDMI port is facing upwards.
  3. 3Plug the "Foolography" end of the HDMI cable into the Entagged HDMI port. The cable should point to the right.
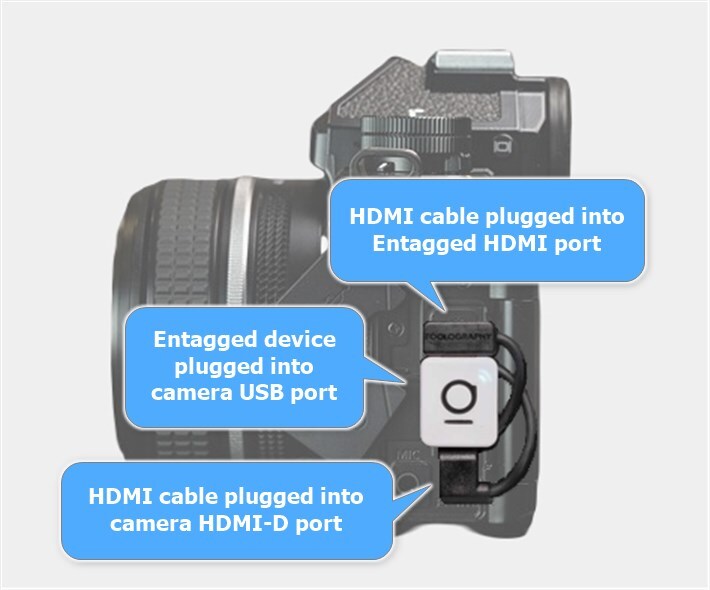
  4. 4Plug your Entagged device (with attached HDMI cable) into your camera’s USB port, and plug the other end of the HDMI cable into your camera’s HDMI port. If the HDMI cable is too close to the Entagged device, you can rotate the Entagged device by 90º or 180º to allow for more space. You can also tuck the HDMI cable behind the Entagged device for a cleaner look.
  5. 5Turn on your camera. The LED of the Entagged should now light up. If not, check that the cable is plugged in the correct direction (step 3) as this is one of the most frequent missteps.
An image showing the Entagged M device attached to a Nikon camera via the magnetic USB plug, with the HDMI cable also connected.
Camera Photo by Richard Butler

Sony Setup

  1. 1Before plugging anything in: In your camera settings, turn on the PC Remote function (Menu → Setup → USB → USB Connection Mode → PC Remote).
  2. 2If you have previously connected to the Image Edge mobile app via WiFi, please disconnect it.
  3. 3If you have previously set your camera to transfer FTP over USB, please turn this off (Menu → Network → Transfer/Remote → FTP Transfer Func. → FTP Function → Off).
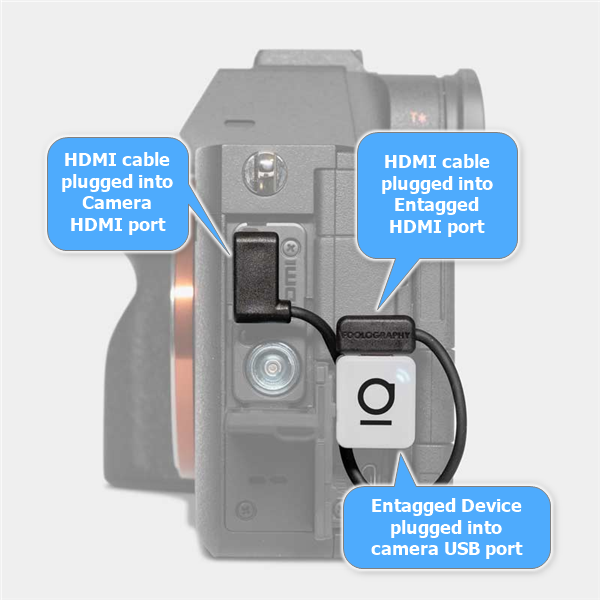
  4. 4Snap the magnetic USB plug onto the back of the Entagged device.
  5. 5With the Entagged logo facing you, ensure its port is facing upwards.
  6. 6Plug the "Foolography" end of the HDMI cable into the top of the Entagged. The cable should point to the right.
  7. 7Plug your Entagged device (with attached HDMI cable) into your camera’s USB port, and plug the other end of the HDMI cable into your camera’s HDMI port. If the HDMI cable is too close to the Entagged device, you can rotate the Entagged device by 90º or 180º to allow for more space. You can also tuck the HDMI cable behind the Entagged device for a cleaner look.
  8. 8Turn on your camera. The LED of the Entagged should now light up. If not, check that the cable is plugged in the correct direction (step 6) as this is one of the most frequent missteps.
An image showing the Entagged device connected to a Sony camera via the USB port and HDMI port.

If your camera has a Micro-USB 3.0 port: The Micro-USB 2.0 magnetic plug is backward compatible and fits into the wider half of the Micro-USB 3.0 port.


Fujifilm Setup

  1. 1Before plugging anything in: In your camera settings, adjust your USB settings: Menu → Set Up → Connection Setting → (PC) Connection Mode → USB Tether Shooting Auto.
  2. 2If you have previously connected to the Fujifilm Cam Remote app via WiFi, please disconnect this.
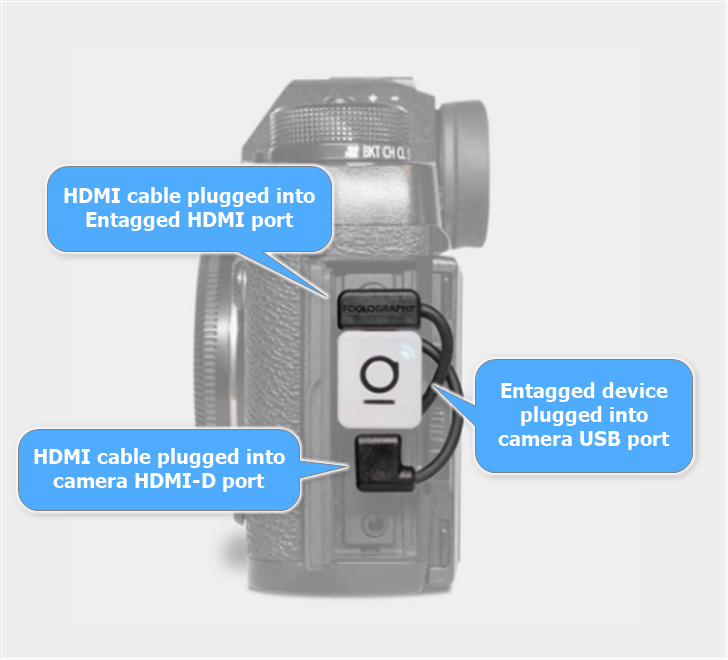
  3. 3Snap the magnetic USB plug onto the back of the Entagged device.
  4. 4With the Entagged logo facing you, ensure its port is facing upwards.
  5. 5Plug the "Foolography" end of the HDMI cable into the top of the Entagged. The cable should point to the right.
  6. 6Plug your Entagged device (with attached HDMI cable) into your camera’s USB port, and plug the other end of the HDMI cable into your camera’s HDMI port. If the HDMI cable is too close to the Entagged device, you can rotate the Entagged device by 90º or 180º to allow for more space. You can also tuck the HDMI cable behind the Entagged device for a cleaner look.
  7. 7Turn on your camera. The LED of the Entagged should now light up. If not, check that the cable is plugged in the correct direction (step 5) as this is one of the most frequent missteps.
An image showing the Entagged device connected to a Fujifilm camera via the USB port and HDMI port.

If your camera has a Micro-USB 3.0 port: The Micro-USB 2.0 magnetic plug is backward compatible and fits into the wider half of the Micro-USB 3.0 port.

After correctly plugging your Entagged device into your camera, it's now time to pair your device with your phone or tablet.


The Takeaway

By following these steps, you've successfully plugged in your Entagged device, ensuring a secure and functional connection to your camera. You're now ready to pair your Entagged device with your Entagged app and/or a barcode scanner to enhance your photography workflow.